Bootloading Guide
Complete guide for loading and executing firmware on the SCuM-V chip through the FPGA controller.
Prerequisites
- FPGA programmed with SCuM-V Controller bitstream (see FPGA Programming Guide)
- RISC-V firmware compiled (see Firmware Development)
- Python 3.x with serial communication libraries
- Proper hardware connections established
This guide assumes you have completed the FPGA Programming and have a working SCuM-V Controller bitstream loaded on your Arty A7-100T.
Communication Interfaces
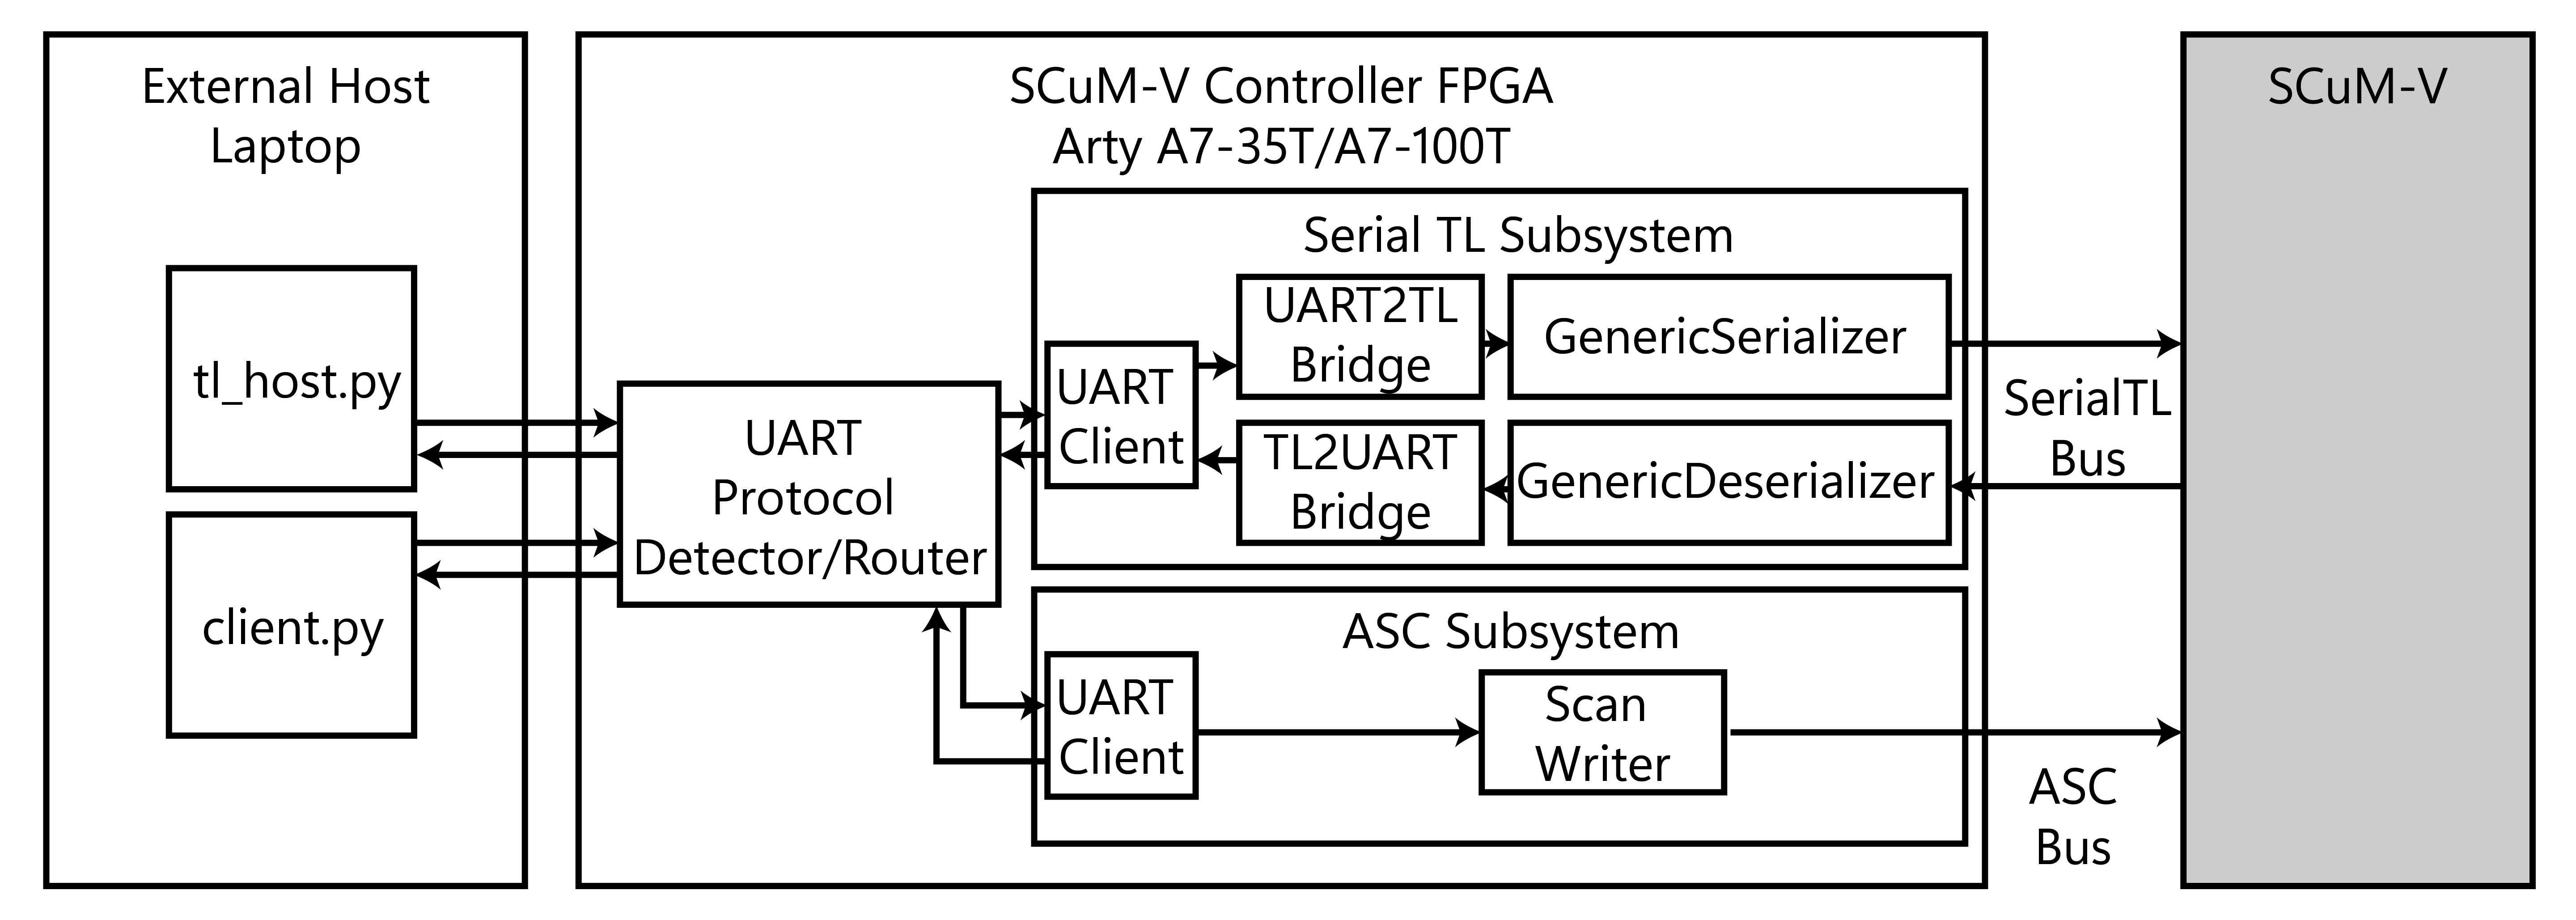
The SCuM-V Controller supports two primary communication paths:
SerialTL (TileLink over UART)
Digital subsystem communication using TileLink transactions over UART for memory access, register configuration, and firmware loading.
Analog Scan Chain (ASC)
Analog subsystem configuration through shift-register based scan chain to interface with the analog blocks without involvement of the digital core.
Host Scripts Overview
- tl_host.py
- tl_host_sim.py
- sensor_adc.py
- hello_world.py
- client.py
tl_host.py - SerialTL Interface
Primary script for SCuM-V digital communication:
cd sw
python tl_host.py [options]
Key Features:
- Firmware programming via SerialTL
- Memory read/write operations
- Register configuration and debugging
- Burst transfer capabilities
Command Line Arguments:
-p/--port: Serial port (default: COM6 must be overridden to the correct port)-t/--target: Target application name (default: template)--baud: Baud rate (default: 2,000,000)--batch: Batch size during flashing (default: 1)
Configuration:
- Default Baud Rate: 2,000,000 (can be overridden)
- Protocol: TileLink-UH (Uncached Heavyweight)
- Interface: UART/SerialTL bridge
client.py - Analog Scan Chain Interface
Script for analog subsystem control:
cd hw
python client.py [scan_chain_commands]
Key Features:
- Analog front-end configuration
- Power system control
- Oscillator and PLL tuning
- Sensor ADC calibration
Firmware Bootloading Process
Prepare Firmware Binary
-
Build Firmware
cd sw/scum_firmware make BUILD_MODE=BRINGUP -
Verify Binary Generation
ls build/*.bin
# Expected: build/simple.bin (or your target application)
Establish Communication
-
Identify COM Port
- Windows: Check Device Manager for “USB Serial Port (COMx)”
- Linux/macOS: Look for
/dev/ttyUSBxor/dev/ttyACMx
-
Test Basic Communication
cd sw
python tl_host.py -p COMx
Load Firmware
Basic Firmware Loading:
# Default target (template)
python tl_host.py -p COMx

# Specify target application
python tl_host.py -p COMx -t simple
python tl_host.py -p COMx -t afe_test
Advanced Loading Options:
# Custom baud rate
python tl_host.py -p COMx --baud 115200

# Custom batch size for faster flashing
python tl_host.py -p COMx --batch 512
Execute Firmware
Start Execution:
The tl_host.py script automatically flashes the binary and triggers execution. Firmware starts running immediately after flashing completes.
# Firmware execution is automatic after flashing
# No additional commands needed
Advanced Bootloading Operations
Memory Operations
Memory Operations:
The current tl_host.py script is primarily designed for firmware flashing. Advanced memory operations require modification of the script or direct use of the TileLinkHost class methods.
# Example using TileLinkHost class directly
from tl_host import TileLinkHost
import serial

# Initialize connection
ser = serial.Serial('COM6', 1000000, timeout=2)
tl = TileLinkHost(ser)

# Read from address
data = tl.read_address(0x80000000)

# Write to address
tl.write_address(0x80000000, 0xDEADBEEF)
Register Configuration
Digital Core Registers:
# Using TileLinkHost class for register access
from tl_host import TileLinkHost
import serial

ser = serial.Serial('COM6', 1000000, timeout=2)
tl = TileLinkHost(ser)

# Read UART registers
tl.read_uart_registers()

# Read baseband registers
tl.read_baseband_registers()
Debugging Support
UART Console Monitoring:
For monitoring firmware output, use a standard terminal program (PuTTY, minicom, etc.) on the UART pins of your hardware setup.
# Use external terminal for monitoring
# Linux/macOS: minicom, screen
# Windows: PuTTY, TeraTerm
Memory Analysis:
# Using TileLinkHost for memory operations
tl.memory_scan()  # Built-in memory scan function
Communication Protocol Details
SerialTL Packet Format
SerialTL uses a custom framing protocol over UART. Refer to hw/scumv-controller/stl_packet_diagram.svg for detailed packet structure.
Packet Structure:
[START] [LENGTH] [OPCODE] [ADDRESS] [DATA] [CHECKSUM] [END]Transaction Types:
- Get: Read operation (address → data)
- Put: Write operation (address + data)
- PutPartial: Partial write with byte enables
ASC Protocol Details
Scan Chain Structure:
- Total Length: Variable (depends on the architecture of SCuM-V, specifically which version)
- Clock Domain: Separate SCAN_CLK from system clock
- Data Format: MSB-first shift register
Block Addressing:
[BLOCK_ID] [REG_ADDR] [DATA_BITS]Script Customization
Extending tl_host.py
Example custom operations:
# Add to tl_host.py
def custom_test_sequence(port):
    # Custom test implementation
    write_register(0x40000000, 0x12345678)
    result = read_register(0x40000004)
    return validate_result(result)
Batch Operations
# Create batch script for repeated operations
cat > batch_program.sh << EOF
#!/bin/bash
python tl_host.py -p COM3 -t app1
sleep 5
python tl_host.py -p COM3 -t app2
EOF
Integration with Development Workflow
Automated Testing
# Continuous integration script
make -C sw/scum_firmware clean all
python tl_host.py -p COM3 -t test_suite
# Use external terminal for monitoring output
Debugging Integration
GDB Remote Debugging (Future Enhancement):
# GDB integration not currently available
# Consider using JTAG debugging through FPGA
Related Guides:
- FPGA Programming → - FPGA bitstream loading
- Firmware Development → - Firmware compilation
- Hardware Setup → - Physical connections